Open a new Windows Forms Application named “PictureViewer”. Rename “Form1.cs” to “frmViewer.cs”.
Form Properties
Size: 500, 420
Text: Picture Viewer
Add a MainMenu to the form from the toolbox. If you do not have the MainMenu right click in the toolbox and select “Choose Items…” From the Dialog box that shows up navigate to the .NET components tab. Scroll down to MainMenu and select the checkbox then click ok. You should now see the MainMenu in your toolbox.
MainMenu Properties
(Name): mMain
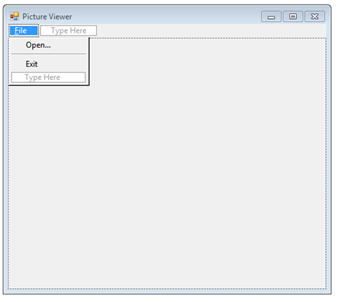
In the type here add “&File” to the main menu. Under File add “Open…” and “Exit”. Now right click on exit and select insert separator.
Click on “File” and insert the properties below. Do the same for Open and Exit.
File Properties
(Name): mmFile
Open Properties
(Name): mmOpen
Exit Properties
(Name): mmExit
Add a Panel to the form from the tool box and use the properties below. We are using a panel to show our image instead of a picture box because it allows us access to the autoscroll property which will give us scroll bars if our picture is larger than the form.
Panel Properties
(Name): pnlImage
AutoScroll: True
Dock: Fill
Your form should now look like the picture below.
Add click events to the Open and Exit buttons in the menu by either double clicking on them or going to the Events in the properties panel and double clicking in the click event dropdown. There should now be two methods names “mmOpen_Click” and “mmExit_Click”. Also go the the panel and create the paint method. There should now be one more method called “pnlImage_Paint.”
Add the following code to your form. The comments will discuss what the code does. Since we are not using a picture box we will store the image in the program by adding an image variable. Your code should look like below.
  Image image; public frmViewer()
  {
  	InitializeComponent();
  }

  private void mmOpen_Click(object sender, EventArgs e)
  {
  	//Create an Open File Dialog box.
    OpenFileDialog ofd = new OpenFileDialog();

    //Set Title and Filter for selecting a Picture.
    ofd.Title = "Select Picture";
    ofd.Filter = "Image Files|*.BMP;*.JPG|Windows Bitmaps|*.BMP|JPEG Files|*.JPG";

    //Show the open file dialog box
    if (ofd.ShowDialog() == DialogResult.OK)
    {
    	//Load the picture into the picture box
        image = Image.FromFile(ofd.FileName);

        //Shows the name of the filein the form's caption and status strip.
        this.Text = string.Concat("Picture Viewer (" + ofd.FileName + ")");

        //Draw the image to the form. DrawImage();
     }
  }

  private void mmExit_Click(object sender, EventArgs e)
  {
  	//Close the window and exit the application
    this.Close();
  }

  private void pnlImage_Paint(object sender, PaintEventArgs e)
  {
  	//Draw the image to the form whenever the panel is drawn.
    DrawImage();
  }

  public void DrawImage()
  {
  	//Do not draw if there is no image.
    if (image == null) return;

    Graphics g = pnlImage.CreateGraphics();

    //Set the minimum size to the picture so we can scroll around a large picture.
    pnlImage.AutoScrollMinSize = new Size((int)(image.Width), (int)(image.Height));

    //Create our center points.
    int c1 = 0;
    int c2 = 0;
    if (this.Width > image.Width) c1 = (pnlImage.Width / 2) - (image.Width / 2);
    if (this.Height > image.Height) c2 = (pnlImage.Height / 2) - (image.Height / 2);

    //Only clear if image is smaller than panel.
    //Helps keep panel from flashing when scrolling on images.
    if (pnlImage.Width > image.Width || pnlImage.Height > image.Height)
    {
    	//Clear the panel for drawing our new image.
        g.Clear(Control.DefaultBackColor);
     }

     //Draw the image to the screen.
     g.DrawImage(image, pnlImage.AutoScrollPosition.X + c1, pnlImage.AutoScrollPosition.Y + c2, image.Width, image.Height);

     //Dispose of all graphics and images used.
     g.Dispose();
   }
You should now be able to run your code. You will be able to open an image and display it in your form. There will be scrollbars if the image is too large to be displayed. This is good if that is all you want your program to do but it is boring. We need to add a way to resize and also display the properties of the image.
Add a status strip from the toolbox to the main form. Add three status labels to the status strip and give it the properties below. Note: After adding the status strip it is best to re-dock the image panel to get the lower slide bar to not be hidden by the status strip.
StatusStrip Properties
(Name): StatusStrip
Text: Status Strip
Label 1 Properties
(Name): lblX
BorderSides: Right
Text: X:
TextAlign: MiddleLeft
AutoSize: False
Size: 50,19
Label 2 Properties
(Name): lblY
BorderSides: Right
Text: Y:
TextAlign: MiddleLeft
AutoSize: False
Size: 50,19
Label 3 Properties
(Name): lblFile
Text:
TextAlign: MiddleLeft
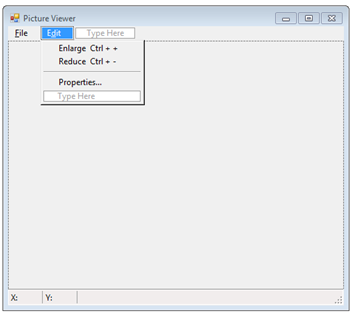
Now add an “E&dit” to the main menu. Underneath add “Enlarge”, “Reduce” and “Properties…” Above the options add another separator. Give the new buttons the properties below.
Edit Properties
(Name): mmEdit
Text: E&dit
Enlarge Properties
(Name): mmEnlarge
Text: Enlarge Ctrl + +
Reduce Properties
(Name): mmReduce
Text: Reduce Ctrl + –
Properties Properties
(Name): mmProperties
Text: Properties…
Your form should now look like the image below.
Add a context menu strip. Add two buttons “Enlarge” and “Reduce.” Then add the properties below.
Enlarge Properties
(Name): cmsEnlarge
ShortcutKeyDisplayString: Ctrl + +
ShortcutKeys:Ctrl_Oemplus
ShowShortcutKeys: True
Text:Enlarge
Reduce Properties
(Name): cmsReduce
ShortcutKeyDisplayString: Ctrl + –
ShortcutKeys:Ctrl_OemMinus
ShowShortcutKeys: True
Text:Reduce
Create click methods for both of the context menu strip buttons. You should now have two methods named “cmsEnlarge_Click” and “cmsReduce_Click.” Add the code below to the new methods. Also add the enlarge and reduce methods to the enlarge and reduce buttons on the main menu.
  private void cmsEnlarge_Click(object sender, EventArgs e)
  {
  	//Check that image is not null then increase size by 5%.
    if (image != null) image = ResizePercent((Bitmap)image, 105);

    //Draw the resized image to the form.
    DrawImage();
  }

  private void cmsReduce_Click(object sender, EventArgs e)
  {
  	//Check that image is not null then increase size by 5%.
    if (image != null) image = ResizePercent((Bitmap)image, 95);

    //Draw the resized image to the form.
    DrawImage();
  }

  private Bitmap ResizePercent(Bitmap image, int Percent)
  {
  	//Set the percent to a number Example: 105% = 1.05
    double percent = ((double)Percent / 100.0);

    //Create the new image height and width.
    int new_width = (int)(image.Width * percent);
    int new_height = (int)(image.Height * percent);

    //Create the new image while maintaining pixel format.
    Bitmap new_Image = new Bitmap(new_width, new_height, image.PixelFormat);

    //Set the new image to the same resolution as the old
    image. new_Image.SetResolution(image.HorizontalResolution, image.VerticalResolution);

    //Create graphics to draw resized image.
    Graphics g = Graphics.FromImage(new_Image);

    //Set the interpolation mode to keep the picture looking as nice as possible.
    g.InterpolationMode = System.Drawing.Drawing2D.InterpolationMode.HighQualityBicubic;

    //Draw the new image.
    g.DrawImage(image, 0, 0, new_width, new_height);

    //Dispose of the graphics and old bitmap.
    g.Dispose();
    image.Dispose();

    //Return the new image.
    return new_Image;
  }
In the properties of the form add the context menu strip to the form. Then go to the panel and add two methods for “MouseMove” and “MouseLeave.” This will add the methods “pnlImage_MouseMove” and “pnlImage_MouseLeave” to your code. Add the following code.
  private void pnlImage_MouseMove(object sender, MouseEventArgs e)
  {
  	//Display the location of the mouse in the panel.
    lblX.Text = "X: " + e.X.ToString();
    lblY.Text = "Y: " + e.Y.ToString();
  }

  private void pnlImage_MouseLeave(object sender, EventArgs e)
  {
  	//Set the labels to empty when mouse leaves
    lblX.Text = "X:";
    lblY.Text = "Y:";
  }
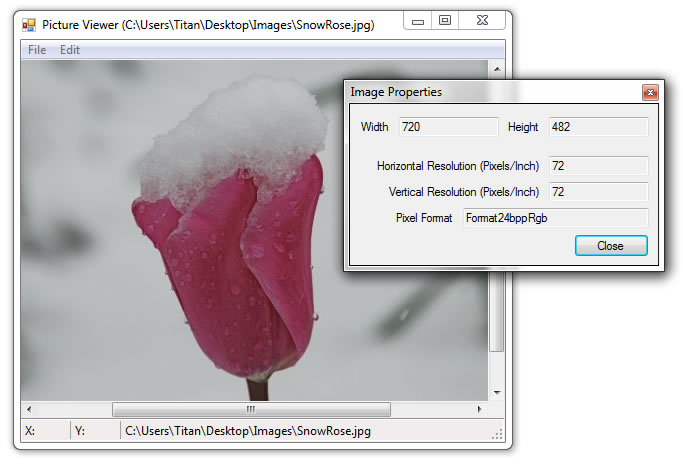
Now we need to add a new form to our project. Name this form “frmProperties.” Add labels, buttons and textboxes (set the text box to read-only) to create a form like the picture below. Then add the code below.”
  private void mmProperties_Click(object sender, EventArgs e)
  {
  	//Return if there is no image.
    if (image == null) return;

    //Create a new Properties form.
    frmProperties frmOptionsDialog = new frmProperties();

    //Set the image in the form to reference the current image.
    frmOptionsDialog.image = image;

    //Show the form as a dialog so the user can't click main form.
    frmOptionsDialog.ShowDialog();
  }
Now if you run the program you should have a fully functional picture viewer that can show you the properties of the image and enlarge and reduce the size of the image.


